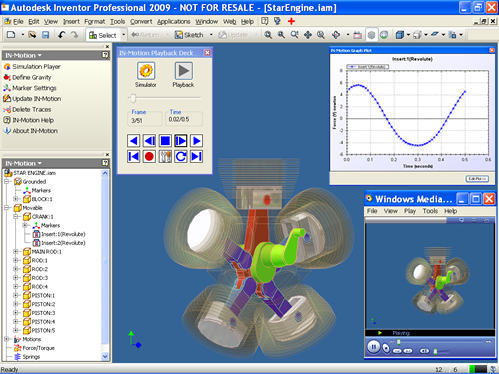
Update: IN-Motion, a Motion and Dynamic Simulation Addin for Autodesk Inventor has been launched by us.
Update: Video tutorials on usage of IN-Motion for Dynamic Simulation of Autodesk Inventor Assemblies.

Autodesk Live was held at Bangalore on September 25th, 2008 at one of the best locations in Bangalore viz Leela Palace. It was mainly concentrated on Autodesk MSD(Mechanical System Design) products. It was my first CAD related conference and I was really excited to be a part of it. The registration for the event had started quite some time back at Autodesk SAARC website and when I googled for any info on what takes place at Autodesk Live, not much info was found about Indian context. So that added to my excitement.
To my surprise, I found close to 300 people who turned out as audience and around 10 guys from Autodesk had assembled to take us through the day’s proceedings. A couple of them had come from Singapore Autodesk SAARC center and others were from Delhi, Pune and also from Bangalore centers. Most of the audience assembled were end users of AutoCAD and some were also from automotive background who had just shifted from AutoCAD to Inventor for better 3D experience and productivity.
The session was started by Mr. Ajay Adwani, who heads MSD, Autodesk SAARC. He gave a key-note presentation about Autodesk in general and how it supports Designers to have an edge on Innovation front to drive the community further. He gave a nice example of how Mr. Ratan Tata envisioned a need for a low-cost car for common people and thus coming up with Nano. Not to wonder why Tata is the largest customer for Autodesk in India. It was also nice to know that Autodesk is the 2nd Software company to exist after Microsoft. He also threw some light on economic growth and stability of the company. It was more of a sales pitch with a message ” Guys, we are the company which has survived from past 26+ years. Everyone trusts us and know that we would always remain in the CAD field”. I am sure people were impressed with it.
The following session was from Mr. Sanjay Gera, who sits at Delhi center and looks after Sales in India. He briefly explained what Digital Prototyping was about and how it had helped companies to achieve better success and productivity. He also showed how 4 islands(depts viz Ideation, Engineering, Manufacturing, Customer) for a Product Manufacture can be seamlessly connected cutting down the cost and reducing the production time.
Then we had Customer sessions where 2 companies shared their success run by using Autodesk products. The first was BEML (Bharat Earth Movers Ltd) which uses Inventor to prototype their heavy machinery before finalizing the design and thus reducing costs enormously. The second company was Sartorious Stedim India Pvt Ltd, which does a lot of work in Biotech and Mechatronics. They have used Inventor to design their boilers, fermenters etc. They also showed how they had used Autodesk Navis Works, which is a great reviewing software, using which you can literally walk over your Assembly in Inventor.
The next session was about Autodesk Subscription by Mr. Ramesh Vedavyaasa and explained about various advantages of having an Autodesk Subscription. It would cost in the beginning, but people could really save the bucks in future, when the go for updates and upgrades. The following were the advantages explained:
- Tech Updrades
- Flexible Payment / Subscription system
- Direct web support
- Communication Center in 2009 products range and later integrated
- E-learning
- Usage of previous version (upto 3 last versions)
- Community Access
- Simplified Software Management
The following session was also taken by Mr. Ramesh Vedavyaasa which was “Building the Next Gen Designers”. He discussed about the challenges faced by CAD using industry viz Skilled Manpower, Rapid changes in Technology and Lack of revenue for Research purposes and how Autodesk has been trying to solve this problem by having a lot of training institutes to teach Autodesk technologies to college students and graduates and also by forming strategic alliances with some of the Universities to groom the talent there. Some of these in India are NID, Ahmedabad, IIT Kanpur, IIT Madras, JJ College, School of Planning and Architecture.
We then had Lunch and could meet a couple of Autodesk guys and also Mr. Thomas of Microgenesis, Bangalore. In the morning, I had also met Sunith Babu of AUGI fame and helped him in distributing AUGI World Magazine to all the attendees.
Post lunch session was the most interesting of the day. Thanks to Mr. Prasad Pandit and his sense of humor. He made sure that nobody would feel drowzy after a heartious meal. He explained ” Whats new in AutoCAD 2009 ?”. Some of the things worth mentioning are
- Ribbon Toolbar
- View CUbe
- Action Recorder
- Layer Properties Managers
- Fit and Finish
- Hover on an object to get its details as tooltip
- Tooltip/brief explaination on hovering on command buttons
- Mark Geographic location and integration with Google Earth with AutoCAD
The next session was “Digital Prototyping”. It was more of a combined session by Mr. Anand Joshi (Alias guy), Mr. Kiran (Inventor guy) and Mr. Ramana (AutoCAD Electrical guy). They showed us how they had solved an industry problem using Digital Prototyping. The problem definition stated them to Design a Floor Polisher for a client with some definite conditions. It began by Anand (looks like George Clooney) showed us how Alias looks like and used his tablet pen to come up with a concept design and then went on to show how they could generate curves and then surfaces and then make a 3D object with surface data in it. He then parsed on the finished data (Class A) to Kiran who then would add thickness to the members according to the Design standards. He explained how Design Accelartor could be used as a ready to use Design Data Book, which has a huge library of design data and also calculate various parameters while designing machine members, and also check whether a particular design is feasible or not. He also showed how AutoLimits could be used to check whether a condition was valid when Kinematic simulation of the Cleaning assembly was taking place. Once mechanical stuffs are done, some Electrical wiring and connections need to be done between the motors and their power sources. So Kiran then parsed the Electrical related data in the form of XML which Mr. Ramana could import in AutoCAD Electrical. He briefly explained the working of it and how we could connect different ports/connectors and simulate the electrical way to check if it works as expected. After connecting the harnesses properly, he gave back the data file to Kiran, who then makes some final modeling to finish of the Assembly.
Anand (Alias guy) then showed us the completed assembly and I must say, I almost fell off my chair. It was really awesome, it looked very real and hats off to Alias rendering engine. It was a great learning session.
Followed was Q & A session with some lucky dip prizes. People came up with good questions and some sounded very trivial to me. Just after the session, I was keen to meet Autodesk guys and in particular anyone who works with Inventor API. I was lucky to meet Mr. Anand Pujari who looks after Inventor addins certification. Had a sound and healthy discussion with him on Inventor customization and got some good inputs from him as well.
In a nutsheel, it was a great day at Autodesk Live and I would definitely be more than willing to attend future sessions as well. Though most of the audience were totally different from what I do or intend to do, I could meet up with some Autodesk folks who did help me out with some queries I had. Looking forward to make a good name in the field of CAD Development and Customization.


 Its been quite some time since I blogged. I was pretty much occupied with the Confusion I had in my mind, as I had hit a Cross-Roads of my career. After quitting my job at HeroHonda R&D, I teamed up with my mentor,